Designer object
Basic object for any OLAP client is
Designer. The Designer will help you to see all the data structures
and individual elements in the currently
selected OLAP cube, prepare and then execute a new MDX
query.
The Designer has three (3) main
parts:
· Cube structure explorer
left-hand side
docking window
· Designer with additional controls
bottom docking
window, and
· Query Result Form
place where result
will be displayed (in the middle)
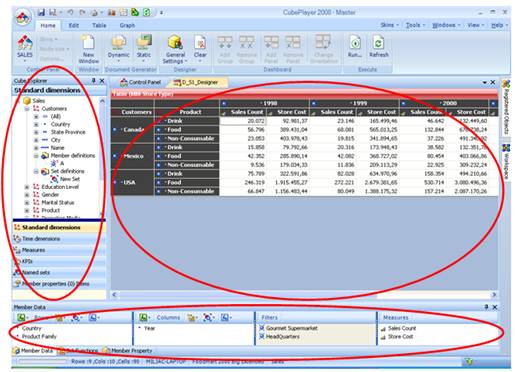
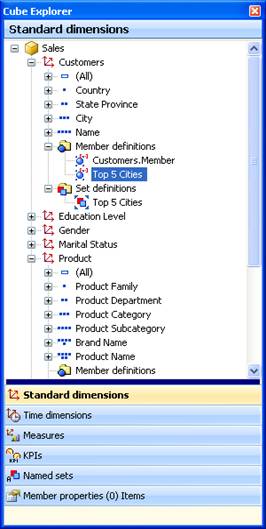 Cube Explorer
The Cube explorer consists of six (6) different areas (tabs):
· Standard dimensions
· Time dimensions
· Measures
· KPIs
· Named sets
· Member properties
MDX Query definition area

MDX
Query definition area takes the most part in the main display area. It is
located on the bottom of the window.
Here
you have three (3) tabs:
· Member Data
o Row data
o Column data
o Filter condition
o Measure data
· Set Functions
o Row Set Functions
o Column Set
Functions
· Member Property
The
most of the time, at least at the beginning, you will stay with first tab Member
Data.
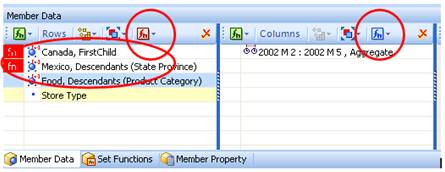
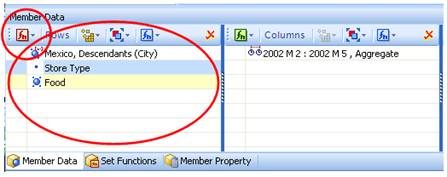
Member data
Member
data tab is place where you add all the elements you need for you MDX query. It
has four (4) different columns:
· Row data
elements that will be
displayed in rows
· Column data elements that will be displayed in columns
· Filter data
elements that will be
used as filters
· Measure data (data area)
measures that will be
used in MDX query
Query
can be created by selecting some items from the cube structure part and placing
it into any of above
mentioned
columns. For instance, if you want to see the results of your query in such a
way that some item
taken from
the cube structure is supposed to be displayed in rows, you would find that item
and drag it to the
row
data column in the designer.
In addition instead of drag-and-drop technique you can use a popup-menu that
will
appear on right hand mouse click and select one of the options.
Additional explanation is needed for Data area.
In
CubePlayer exists predefined place for measures.
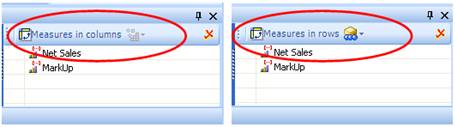
Default place for Measures is in Columns.
However
if you need to place your measures in Rows just click on label Measures in …
Once
changed, it will be applied immediately but only for this Designer
object.
To
change for each designer object got to menu Tools-Configuration-Designer and
change there.
We have
done it this way, because most of users in most of cases will place measures in
Columns.
Therefore, when you are selecting Measures you can do it with simple
double-click on each measure
without
need for dragging. Measures will be always placed in Data area. If you want to
place you measures in Rows,
please go
to tab General and select Measures in Rows.
Dimension
Functions
Dimension
Functions are MDX functions applied to the group of elements (levels or members)
from
the same dimension
hierarchy within one axis (rows or columns).
To
select appropriate OLAP function, select blue function icon![]() inside row or column axis title
bar
inside row or column axis title
bar
You
will get a list of available dimensions.

After
selecting dimension/hierarchy continue with selecting
functions.
Select
one from the list and same dialog, as for Se functions, will appear.
After
selection of function parameters select Accept to apply
function.
On each
axis, once dimension function is applied icon will change color from default![]() to red
to red
![]() .
.
This
way you will always be notified about the function
presence.
Dimension functions can be easily removed and
edited.
User
can apply any number of functions per one
dimension/hierarchy.
Inner
Functions
Inner Functions
are MDX functions applied to the only one element (level or member) or
CP special member inside one axis (rows or
columns).
User can
combine any number of functions.
To
select appropriate Inner function:
· select element inside row or column
axis
· right click your mouse
· select Inner function from popup
menu
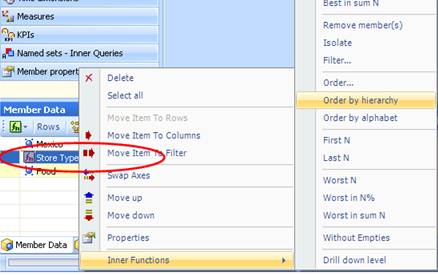
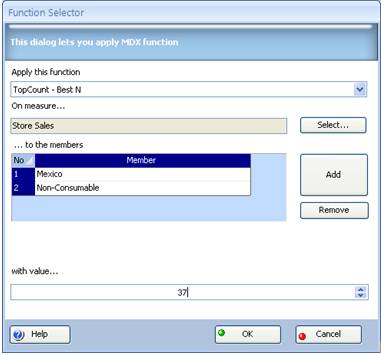
Dialog
will appear:
After
selection of function parameters select Accept to apply
function.
On each
axis, once inner function have been applied, particular member or level icon
will change to red ![]() .
.
This
way you will always be notified about the function
presence.
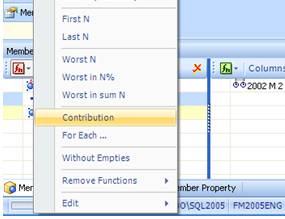
Set Functions (external or axis functions)
Set Functions
tab is used to define OLAP functions. Those functions (so called outer or axis
functions) will be applied
to row or column
axis. Tab has two (2) different columns:
· Row set functions
location for
functions to be applied to row
· Column set functions location for functions to be applied to column
To
apply the function simply select Row or Column area and right click your mouse.
Popup-menu will appear:
· New set function to select new function
· Edit to edit previous definition
· Delete to delete existing function
· Move up
to move up function
and change order
· Move down
to move down function
and change order.
Select
New set function and dialog will appear:
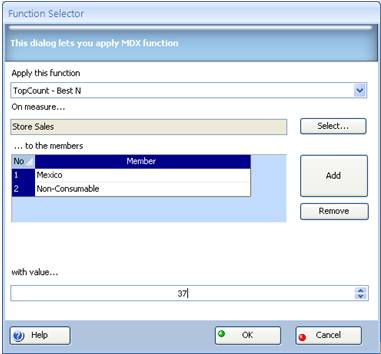
Select
appropriate OLAP function, set appropriate parameters and select
Accept.
Other,
more easier way to do it is to select function icon![]() inside row or column axis title
bar
inside row or column axis title
bar
You
will get a list of available function.
Select
one from the list and same dialog, as previous one, will appear. After selection
of function parameters select
Accept
to apply function.
On each
axis, once function is applied icon will change color from default![]() to red
to red
![]() .
.
This
way you will always be notified about the function
presence.
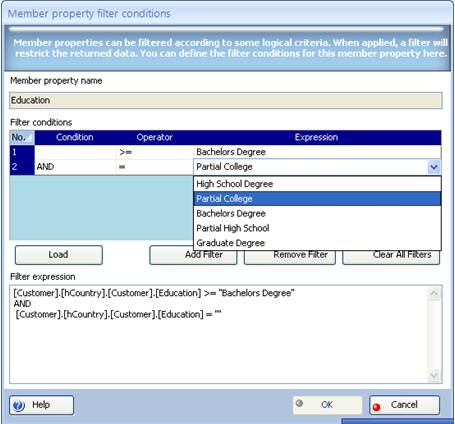
Member properties
Next
tab is Member properties tab. Similar to the named sets, member properties
(sometimes referred to as: extended
member
properties) are another high-level feature available on the Microsoft OLAP
server. Specifically, your administrator
can create
any number of predefined member property definitions on the server. Those
definitions do contain data, and
you can
use them to significantly improve the power of the Designer. As you might have
expected, CubePlayer supports
working
with member properties directly in the Designer. But, its capabilities do not
stop at the simple possibility of including
some
member properties in your final results. With CubePlayer you can easily filter
your data by existing
member
properties! Whenever you add some item from the currently opened OLAP cube to
the rows or columns,
CubePlayer checks for the presence of any member properties. All
found member property definitions are then
listed in
the Cube explorer under tab Member Properties. If there are any you can notice
according to the number
displayed
near the label Member Properties:
· zero (0) means no Member Properties
· X where it represents any number > 0 means there are X Member Properties
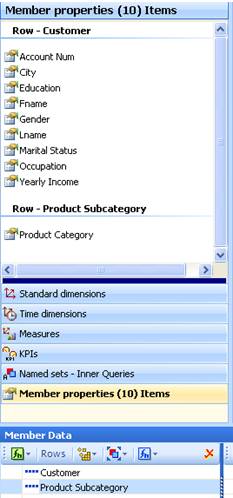
You can use them similarly as you would
use any other standard level, member or a measure.